I currently have 50 Flickr Sets, and wanted to sort them alphabetically. However there appears to be no function to do this. You can sort photos within a set but not the sets themselves on the Flickr page.
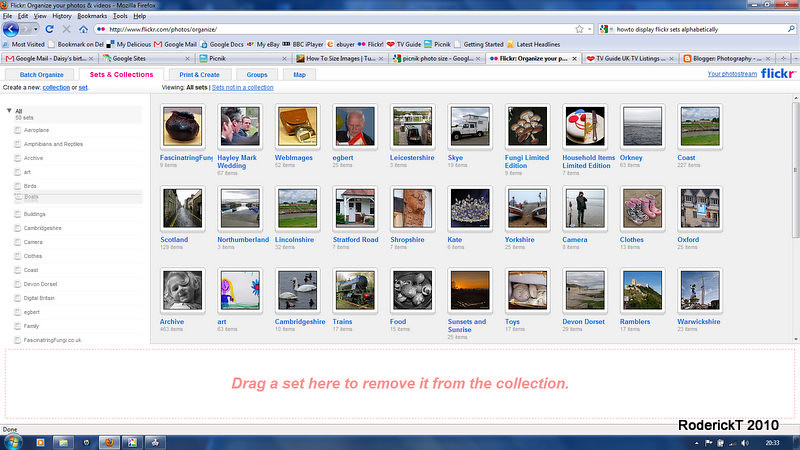
Sets within a Collection can be manually sorted, so I created a collection called ALL and have manually sorted these sets alphabetically. Took about 5 minutes but should be a one off exercise. Next time I create a set all I need do is add it to ALL collection abd move it to the relevant position.
To create this Collection and organize alphabetically go to the Flickr Organize screen and select "Collections and Sets" Tab, create new Collection and drag and drop the Sets into it making sure you drop them alphabetically. I did this by taking each Set in sequence as shown by default on the display, and as I dragged it into the column on the left under the ALL Collection I made sure I dropped it in the correct place alphabetically. If you miss you can position your mouse over it in the left column and drag it to correct place.
Saturday, June 12, 2010
Monday, June 07, 2010
Adding or editing Flickr blogger link solved.
Flickr now has the ability to post directly to several Blogger applications. This is quite simple to set up, it is the last option under the share button.
However I struggled to find out how to change ny template or add further blogs once I had created my first.
If you want to do this then you need to go to following link.
http://www.flickr.com/blogs.gne
However I struggled to find out how to change ny template or add further blogs once I had created my first.
If you want to do this then you need to go to following link.
http://www.flickr.com/blogs.gne
Wednesday, May 19, 2010
Picasa - How to reduce brightness
There is no general brilliance control provided in Picasa. You can increase highlights and/or add fill-in light to increase brilliance, You can also make the dark areas darker by adjusting the shadow slider, but this does not effect the bright and mid tones.
However you can achieve overall darkening by using the graduated filter. This is generally used to decrease the brightness of the sky and enhance blue colour or cloud definition. In this effect you set where the graduation is to end which is indicated by a cross which is set at the centre of the photo, the amount of shade and feathering.
If you drag down the cross to the bottom of the photo and set the feather to 0, then the whole image is darkened uniformly and the amount can be controlled by the shade slider.
You can also change the colour of the shade, but being colour blind I keep away from this feature.
Saturday, April 24, 2010
Photoshop Elements 6 - Camera RAW Profile
The RAW processing in my PSE did not have any camera profile.
I discovered that as well as replacing Camera Raw.8bi you need to execute the program CameraProfiles.exe Both these are downloaded from Adobe, and I used the ZIP for PSE v6 file found at http://www.adobe.com/support/downloads/thankyou.jsp?ftpID=4582&fileID=4238
Note Camera_RAW_5_5.zip is the latest version supported on PSE 6. Itried v5.6 and 5.7 and confirmed these did not work
Saturday, March 27, 2010
Nikon D90 First Thoughts
At the recent Focus of Imaging I upgraded my Nikon D80 to a D90. I chose the FoI as deals were available and I purchased D90 with Sigma 18-55 f2.8-4 AF OS lens. I sold lens on eBay immediately and offset some of the cost.
The first thing I noticed was how good images were at higher ISO settings, even up to 1600 ASA. Other things I noticed quickly were
Faster continuous shutter operation.
Easier menus.
Brilliant screen.
The first thing I noticed was how good images were at higher ISO settings, even up to 1600 ASA. Other things I noticed quickly were
Faster continuous shutter operation.
Easier menus.
Brilliant screen.
Monday, November 16, 2009
PhotoShop Elements Curves Plugin
V 2.1 |
Curves Adjustment for Photoshop Elements
(Test entry for Scribefire)Photoshop Elements offers in opposite to its professional version no curves command. That's a pity, because curves are a valuable tool for image editing.
To remedy this shortcoming this site offers the plugin SmartCurve to upgrade this ability. Of course this plugin can be used from all programs which can integrate Photoshop plugins.
Features:
- Curves adjustment of RGB and gray images.
- Full support of 8 and 16 bits color depth.
- Use of the more common gamma correction.
- Smart-display of the live histogram.
- Auto level correction by setting of shadows and highlights.
- Remove of color casts by setting of multiple midtones.
- Highlighting of clipped colors.
- Different color spaces like RGB, CMK, Lab and others.
- Channel masks to limit curve effects.
- Works as smart filter in PhotoShop CS3.
- Pixel and percentage curve editing and view.
- Batch Mode for applying a curve on multiple images.
Please read the help provided by the program to learn all features and functions of SmartCurve.
This plugin is useful not only for Photoshop Element user, since it offers solid curve adjustment beyond the ability of many other programs.
Saturday, March 28, 2009
Picasa Renaming multiple files
Ror years now I have been irritated by two aspects of Picasa when renaming multiple files.
- If the the name ends with a number it increments this number and does not just add an incremental suffix
Example if there are 3 photos that end with, say nikon_d80, it makes the files name end with d80, d81, d82 whereas what I wanted was d80-0, d8-1, d80-2 - If the name ends with a none-number letter then it adds nothing to the first, and then increases by one thereafter.
Example if 3 files end with tree, it will be named tree, tree-1, tree-2 and to ensure they are displayed in the correct sequence I have to rename the first file as tree-0 after the bulk rename as a separate step.
Subscribe to:
Posts (Atom)